Step 2 - Create a User
Create a user to receive funds from
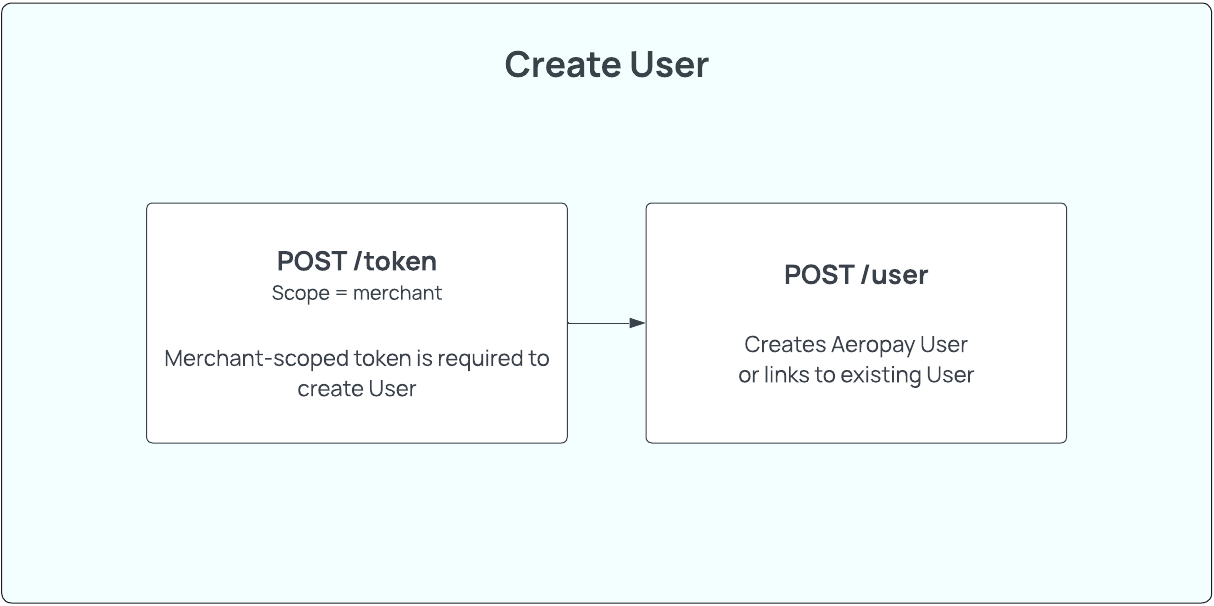
Aeropay users are individuals, uniquely identified by a phone number, who can link bank accounts and make transactions. If you are opting for white-labeled user creation in your application, you'll need to create a user before initiating a transaction.
Note that if the user you are creating already has an account with Aeropay, their existing account information will be returned.
Create a User workflow
Step 2a - Create the User
HTTP request
Sandbox - POST https://api.sandbox-pay.aero.inc/v2/user
Production - POST https://api.aeropay.com/v2/user
Request parameters
| Parameter | Required? | Type | Description |
|---|---|---|---|
| firstName | Yes | String | The User's first name as shown on their government ID Min xx characters Max xx characters |
| lastName | Yes | String | The User's last name as shown on their government ID Min xx characters Max xx characters |
| phoneNumber | Yes | String | The User's phone number Must be in international format (+11234567890) Landline, VOIP, or prepaid phone numbers are invalid in production. |
| Yes | String | The User's email address Must be a valid email address |
Code Example - Request
curl --request POST \
     --url https://api.sandbox-pay.aero.inc/v2/user \
     --header 'Content-Type: application/json' \
     --header 'X-API-Version: 1.1' \
     --header 'accept: application/json' \
     --header 'authorization: Bearer {{token}}' \
     --data '
{
  "firstName": "Jane",
  "lastName": "Doe",
  "phoneNumber": "+11234567890",
  "email": "[email protected]"
}
Code Example - Response
Aeropay will respond with the full user object if the user is new to Aeropay.
{
    "user": {
        "id": "151a8229-69b3-4478-a9a2-9040c68b90be",
        "firstName": "Jane",
        "lastName": "Doe",
        "type": "consumer",
        "email": "[email protected]",
        "phoneNumber": "+11234567890",
        "createdDate": "2025-10-22T18:40:01+00:00"
    },
    "mfaType": "sms"
}
mfaTypePossible values are
"sms"(default) ornull, determined by merchant settings.
Error codes
| HTTP status | Error Code | Meaning | Resolution | Message |
|---|---|---|---|---|
| 200 | N/A | Missing phoneNumber parameter | Provide parameter 'phoneNumber' | Phone number required to create an AeroPay user |
Step 2B - Confirm User Identity
In the case the user you've created already exists in the Aeropay ecosystem, you will relieve an error from POST /v2/user that the user you created has previously used Aeropay. Aeropay will send an MFA code to the user's phone registered with their pre-existing Aeropay account. This MFA code has a TTL of 15 minutes.
You will have to verify the user's identity with POST /v2/confirmUser. The POST /v2/confirmUser API can be used to verify the user's identity by requiring the user to enter an MFA code sent to the phone on file with Aeropay. Note: Aeropay handles sending of these MFA codes.
Sandbox: OTP bypassIn sandbox, you can bypass the MFA challenge by passing
000000as thecodeparameter. The OTP is still sent to the user's phone, but you do not need to use the real code.{ "userId": "...", "code": "000000", "merchantId": "..." }
HTTP request
Sandbox - POST https://api.sandbox-pay.aero.inc/v2/confirmUser
Production - POST https://api.aeropay.com/v2/confirmUser
Request parameters
| Parameter | Required? | Type | Description |
|---|---|---|---|
| userId | Yes | String | The User's Aeropay userid |
| code | Yes | String | MFA code provided by user. |
Code Example - Request
curl --request POST \
     --url https://api.sandbox-pay.aero.inc/v2/confirmUser \
     --header 'Content-Type: application/json' \
     --header 'accept: application/json' \
     --header 'authorization: Bearer {{token}}' \
     --data '
{
  "merchantId": "1234", // merchantId
  "userId": "123123", // userId of user
  "code": "234153", // MFA code provided by user via phone
}
Code Example - Response
{
    "user": {
        "id": "151a8229-69b3-4478-a9a2-9040c68b90be",
        "firstName": "Jane",
        "lastName": "Doe",
        "type": "consumer",
        "email": "[email protected]",
        "phone": "+11234567890",
        "createdDate": "2025-10-22T18:40:01+00:00",
        "userStatus": "Active"
    }
}
Step 2C - Retrieve the User Details
Aeropay recommends saving the user.id and demographic information in your own database, but the user's actively-linked bank accounts must be fetched before making a transaction. To fetch the user's linked bank accounts, use the GET /v2/bankAccounts endpoint. The GET /v2/user API can be used to fetch all relevant user information by searching on the user's Aeropay user.id.
HTTP request (bankAccounts)
Sandbox - GET https://api.sandbox-pay.aero.inc/v2/bankAccounts
Production - GET https://api.aeropay.com/v2/bankAccounts
Request parameters
This endpoint does not require query parameters. The user's bank accounts are retrieved based on the authorization token provided.
Code Example - Request
curl --request GET \
     --url https://api.sandbox-pay.aero.inc/v2/bankAccounts \
     --header 'Content-Type: application/json' \
     --header 'accept: application/json' \
     --header 'authorization: Bearer {{userForMerchant token}}'
Code Example - Response
{
  "bankAccounts": [
    {
      "bankAccountId": 1139036,
      "bankName": "Aerosync Bank (MFA)",
      "accountLast4": "3535",
      "name": "Aerosync Checking",
      "isSelected": true,
      "accountType": "checking",
      "status": "verified",
      "createdDate": "2025-12-01T18:52:37+00:00"
    },
    {
      "bankAccountId": 1139682,
      "bankName": "Aerosync Bank (oAuth)",
      "accountLast4": "1329",
      "name": "Aerosync Checking",
      "isSelected": false,
      "accountType": "checking",
      "status": "verified",
      "createdDate": "2025-12-11T21:50:22+00:00"
    }
  ]
}
HTTP request (user)
Sandbox - GET https://api.sandbox-pay.aero.inc/v2/user
Production - GET https://api.aeropay.com/v2/user
Request parameters
| Parameter | Required? | Type | Description |
|---|---|---|---|
| id | Yes | String | The User's Aeropay userid |
Code Example - Request
curl --request GET \
     --url https://api.sandbox-pay.aero.inc/v2/user \
     --header 'Content-Type: application/json' \
     --header 'accept: application/json' \
     --header 'authorization: Bearer {{user or userForMerchant token}}'
Code Example - Response
{
    "user": {
        "id": "151a8229-69b3-4478-a9a2-9040c68b90be",
        "firstName": "Jane",
        "lastName": "Doe",
        "type": "consumer",
        "email": "[email protected]",
        "phoneNumber": "+11234567890",
        "createdDate": "2025-10-22T18:40:01+00:00",
        "userStatus": "Active"
    }
}